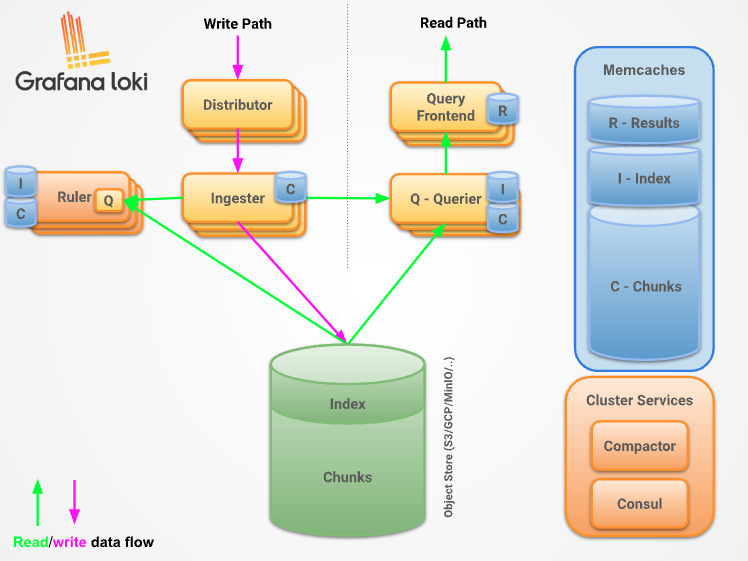
Home avatar

蜷缩的蜗牛

专注云原生运维

源码分析 Kubernetes Scheduler 核心调度器的实现原理

https://xiaorui-cc.oss-cn-hangzhou.aliyuncs.com/images/202301/202301251502086.png

基于 kubernetes v1.27.0 源码分析 scheduler 调度器

k8s scheduler 的主要职责是为新创建的 pod 寻找一个最合适的 node 节点, 然后进行 bind node 绑定, 后面 kubelet 才会监听到并创建真正的 pod.

那么问题来了, 如何为 pod 寻找最合适的 node ? 调度器需要经过 predicates 预选和 priority 优选.

Istio故障排除常用指令

局部开启 Access 日志

 1
 2
 3
 4
 5
 6
 7
 8
 9
10
11
12
13
14
15
16
17
18
19
20
21
22
23
24
25
26
27
28
29
30
31
export NAMESPACE=default
export WORKLOAD=details
cat << EOF | kubectl apply -f -
apiVersion: networking.istio.io/v1alpha3
kind: EnvoyFilter
metadata:
  name: enable-accesslog
  namespace: ${NAMESPACE}
spec:
  configPatches:
  - applyTo: NETWORK_FILTER
    match:
      context: ANY
      listener:
        filterChain:
          filter:
            name: envoy.filters.network.http_connection_manager
    patch:
      operation: MERGE
      value:
        typed_config:
          '@type': type.googleapis.com/envoy.extensions.filters.network.http_connection_manager.v3.HttpConnectionManager
          access_log:
          - name: envoy.access_loggers.file
            typed_config:
              '@type': type.googleapis.com/envoy.extensions.access_loggers.file.v3.FileAccessLog
              path: /dev/stdout
  workloadSelector:
    labels:
      app: ${WORKLOAD}
EOF

修改 Envoy 日志级别

修改所有 logger

1
2
export POD_NAME=xxx
kubectl exec -ti -n ${NAMESPACE} ${POD_NAME} -c istio-proxy -- curl -X POST 127.0.0.1:15000/logging\?level=info
 1
 2
 3
 4
 5
 6
 7
 8
 9
10
11
12
13
14
15
16
17
18
19
20
21
22
23
24
25
26
27
28
29
30
31
32
33
34
35
36
37
38
39
40
41
42
43
44
45
46
47
48
49
50
51
52
active loggers:
  admin: info
  alternate_protocols_cache: info
  aws: info
  assert: info
  backtrace: info
  cache_filter: info
  client: info
  config: info
  connection: info
  conn_handler: info
  decompression: info
  dns: info
  dubbo: info
  envoy_bug: info
  ext_authz: info
  rocketmq: info
  file: info
  filter: info
  forward_proxy: info
  grpc: info
  hc: info
  health_checker: info
  http: info
  http2: info
  hystrix: info
  init: info
  io: info
  jwt: info
  kafka: info
  key_value_store: info
  lua: info
  main: info
  matcher: info
  misc: info
  mongo: info
  quic: info
  quic_stream: info
  pool: info
  rbac: info
  redis: info
  router: info
  runtime: info
  stats: info
  secret: info
  tap: info
  testing: info
  thrift: info
  tracing: info
  upstream: info
  udp: info
  wasm: info

修改其中一个 logger 级别

1
kubectl exec -ti -n ${NAMESPACE} ${POD_NAME} -c istio-proxy -- curl -X POST 127.0.0.1:15000/logging\?http=trace
1
2
3
4
5
6
7
8
9
active loggers:
...
...
  health_checker: warning
  http: trace
  http2: warning
  hystrix: warning
...
...
1
2
3
4
5
6
pod=`kubectl get pod -n istio-system -l app=istiod -o name`
kubectl exec $pod -n istio-system -- curl http://127.0.0.1:15014/debug/$@
kubectl exec $pod -n istio-system -- curl http://127.0.0.1:15014/debug/endpointz
kubectl exec $pod -n istio-system -- curl http://127.0.0.1:15014/debug/adsz
kubectl exec $pod -n istio-system -- curl http://127.0.0.1:15014/debug/registryz
kubectl exec $pod -n istio-system -- curl http://127.0.0.1:15014/debug/configz

常用脚本

由于线上主机初始化没有安装 socat, 在使用istioctl是无法转发端口,所以直接导出 Envoy 的配置,然后在使用 istioctl操作。

导出config

1
2
3
4
namespace=zsl-test
pod_name=mydemo-my-demo-sgcanshu-4vb7b

kubectl exec -ti -n ${namespace} ${pod_name} -c istio-proxy -- curl http://127.0.0.1:15000/config_dump > config_dump.json

导出cluster,(endpoint)

1
kubectl exec -ti -n ${namespace} ${pod_name} -c istio-proxy -- curl "http://127.0.0.1:15000/clusters?format=json" > envoy-clusters.json

istioctl 分析文件

1
2
3
4
istioctl proxy-config listener -f config_dump.json --port 5000
istioctl proxy-config endpoints -f envoy-cluster.json --cluster "outbound|5000||helloworld.sample.svc.cluster.local"
# 过滤存在多版本的Endpoint
istioctl proxy-config endpoints -f envoy-clusters.json | awk -F'[ ]+' '$NF ~ /outbound\|[0-9]+\|[^|]+\|/ {print $0}'

Argo全家桶之argo-Workflow

安装 Argo workflow

1
2
kubectl create namespace argo
kubectl apply -n argo -f https://github.com/argoproj/argo-workflows/releases/download/v3.4.9/install.yaml

安装 Argo Events

1
2
3
4
kubectl create namespace argo-events
kubectl apply -f https://raw.githubusercontent.com/argoproj/argo-events/stable/manifests/install.yaml
# Install with a validating admission controller
kubectl apply -f https://raw.githubusercontent.com/argoproj/argo-events/stable/manifests/install-validating-webhook.yaml

Istio Ambient 模式使用

下载 Ambient Mesh 预览版

1
curl -L https://istio.io/downloadIstio | ISTIO_VERSION=1.18.0-alpha.0 TARGET_ARCH=x86_64 sh -

利用 kind 创建 k8s 集群

1
2
3
4
5
6
7
8
9
kind create cluster --config=- <<EOF
kind: Cluster
apiVersion: kind.x-k8s.io/v1alpha4
name: ambient
nodes:
- role: control-plane
- role: worker
- role: worker
EOF

注意kind 安装的k8s版本大于等于 1.23

0%